In Reef Aquarium Photography – Part 1 we discussed a little about the camera, as well as some of the equipment used to help you get quality shots. In this segment, we’ll discuss the actual camera modes and settings used to get great shots. Please keep in mind that our attention will be focused on DSLR cameras.
Camera Modes:
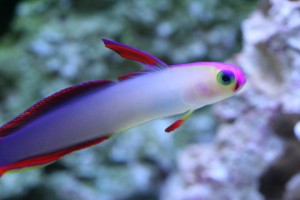
Before you even start, the camera needs to be in the right mode. Auto mode can be used, but it lacks the capabilities to capture moving objects or reflect actual colors. The best camera mode to use for capturing quality pictures is Aperture-Priority mode. The use of Aperture-Priority mode is primarily for controlling the depth of field. The larger the aperture, the shallower the depth of field. The shallower the depth of field makes the main subjects standing out more and blurs the background. To display the concept, take notice in the following picture of the purple firefish. The fish is in focus, but the background is not. The fish is clearly the subject of the photo and it looks great.
To change the depth of field, change your camera’s f-stop. When the f-stop is at its lowest level, the shutter speed will be at its fastest. Increasing the f-stop will probably result in blurry images as the shutter speed will be slower. The f-stop will vary from camera to camera and lens to lens. For example, on my Canon Rebel XSi, the lowest f-stop I can achieve with the stock lens is f/4.5. Using the same camera but switching to a 100-mm macro lens, the lowest f-stop achievable is f/2.8.
White Balance:
The next major aspect of good aquarium photography is the highly overlooked white balance. The camera uses a white balance setting to adjust the color of the resulting pictures. This setting is important to tweak since the light over the aquarium is typically pretty blue.
The auto white balance function works to some extent, but the camera will not capture or display all of the vibrant colors of your aquarium. Instead, it’s wise to manually adjust the white balance. To do this, take a piece of white PVC, or any other white object for that matter, and hold it in the tank, under the aquarium’s light. Find the manual white balance on your camera and select it to set the new white balance. Point your camera at the white object and depress the button. The new white balance will be registered in your camera’s settings and you can use it indefinitely.
ISO Settings:
The ISO, or film speed, is another overlooked tool on your camera. Obviously digital cameras don’t have film, but the settings work the same as they do on film cameras. The ISO setting is very important when photographing fish or other fast moving objects. Simply turn the ISO up and previously blurred fish will now show up unblurred (or at least less blurred). Most cameras will have a max film speed of 1600, but 800 is a more acceptable speed. At higher speeds, your images will lose quality and become grainy.
This wraps up this segment of AquaNerd’s Reef Aquarium Photography lessons. In Part 3, we’ll focus on lenses.



Pingback: Reef Aquarium Photography Part 3, DSLR Lenses | AquaNerd()